A P-trap is an essential plumbing component used to prevent sewer gases from entering your home or building. It’s commonly found under sinks, showers, and bathtubs, and its distinctive shape resembles the letter “P,” hence the name. Installing a P-trap is a straightforward process that can be done with basic tools and a little know-how. In this guide, we’ll walk you through the steps to install a P-trap effectively.
1. Gather Your Tools and Materials
Before you begin, make sure you have the necessary tools and materials:
- P-trap kit (includes the trap, nuts, washers, and seals)
- Adjustable wrench
- Pipe cutter or hacksaw
- Pipe joint compound or plumber’s tape
- Bucket or basin
- Towels or rags
2. Turn Off the Water Supply
Locate the shut-off valves under the sink or wherever the plumbing fixture is located. Turn off both the hot and cold water supply to the fixture. Open the faucet to drain any remaining water from the pipes.
3. Remove the Old P-Trap (if applicable)
If you’re replacing an old P-trap, use your adjustable wrench to loosen the slip nuts connecting the trap to the drainpipe and the tailpiece from the sink drain. Place a bucket or basin underneath to catch any water or debris that may spill out.
Carefully disconnect the old trap and inspect it for any damage or blockages. Clean the connections on the drainpipe and tailpiece to ensure a proper seal with the new trap.
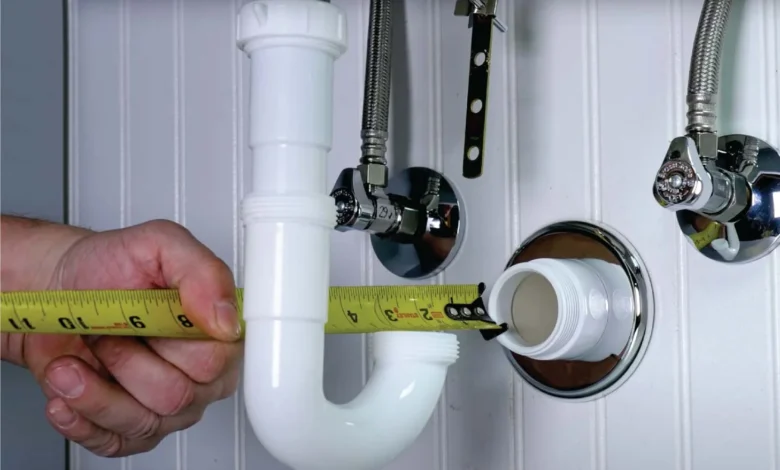
4. Measure and Cut the Pipes (if necessary)
If the new P-trap kit’s pipes are longer than needed, use a pipe cutter or hacksaw to trim them to the correct length. Measure carefully to ensure a proper fit without gaps or leaks.
5. Assemble the P-Trap
Assemble the new P-trap according to the manufacturer’s instructions. Start by sliding the slip nut and washer onto the tailpiece of the sink drain. Then, connect the trap arm to the tailpiece, making sure it aligns properly.
Next, connect the trap bend to the trap arm and tighten the slip nut by hand. Use an adjustable wrench to secure the connections snugly, but be careful not to over-tighten, which can cause damage or leaks.
6. Connect the P-Trap to the Drainpipe
Slide the slip nut and washer onto the open end of the trap bend. Position the trap under the drainpipe, aligning the trap bend with the pipe opening. Tighten the slip nut by hand, then use the adjustable wrench to secure it firmly.
7. Check for Leaks
Once the P-trap is securely installed, turn on the water supply and check for any leaks. Run water through the fixture and inspect the connections for signs of dripping or moisture. If you notice any leaks, tighten the slip nuts slightly until the leaks stop.
8. Apply Pipe Joint Compound or Plumber’s Tape (Optional)
To ensure a watertight seal, you can apply pipe joint compound or plumber’s tape to the threaded connections of the slip nuts before tightening them. This helps prevent leaks and improves the overall stability of the P-trap assembly.
9. Clean Up and Test
Wipe down the area around the P-trap with a towel or rag to remove any excess water or debris. Dispose of any old parts or materials properly. Once everything is clean and dry, test the fixture by running water and checking for leaks again.
10. Final Inspection
After the installation is complete and there are no leaks, visually inspect the entire P-trap assembly to ensure it’s properly aligned and secure. Double-check all connections and tighten any loose fittings if necessary.
Congratulations, you’ve successfully installed a Ptrap! Regular maintenance and periodic inspections can help prevent clogs and ensure the trap continues to function efficiently.
In summary, installing a P-trap involves gathering the necessary tools and materials, turning off the water supply, removing the old trap (if applicable), measuring and cutting pipes as needed, assembling the new trap, connecting it to the drainpipe, checking for leaks, applying pipe joint compound or plumber’s tape if desired, cleaning up, testing the fixture, and conducting a final inspection. With these steps and a little patience, you can tackle this plumbing task with confidence.